Slicker Brush
Chris Christensen Big G — the standard for Giant Schnauzer coats
View on Amazon →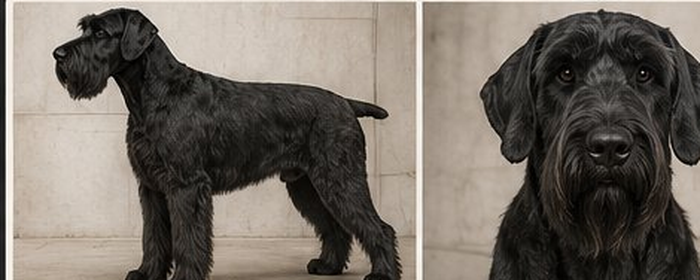
Everything we've learned keeping a 74-pound Giant Schnauzer clean, healthy, and looking like himself — from the bath to the beard, the coat science, and the difference between the right way and the easy way.
The Giant Schnauzer is a working breed with serious drive and serious size. Grooming is part of building trust with a dog this strong-willed.
A wiry topcoat over a soft, dense undercoat. The two layers do very different jobs — and require very different handling.
Drop ears trap moisture, wax, and debris. Weekly checks and gentle cleaning are non-negotiable preventive care.
Everything we've learned keeping a 74-pound Giant Schnauzer clean, healthy, and looking like himself — from the bath to the beard, the coat science, and the difference between the right way and the easy way.
Chris Christensen Big G — the standard for Giant Schnauzer coats
View on Amazon →Wide-tooth metal comb for detangling furnishings and finishing
View on Amazon →GoPets 2-in-1 dematting comb and undercoat rake
View on Amazon →oneisall heavy-duty clippers built for thick double coats
View on Amazon →GLADOG 5-in-1 grooming scissors — thinning, straight, and curved
View on Amazon →Doubles as your carding tool — one purchase covers both techniques
View on Amazon →Vetnique Oticbliss — formulated for floppy drop ears
View on Amazon →Any drugstore brand works — buy in bulk
Product links are provided for reference. Where's Toddy may earn a small commission on qualifying purchases.
Step-by-Step Grooming Guide — 10 Steps to a Clean Balanced Groom
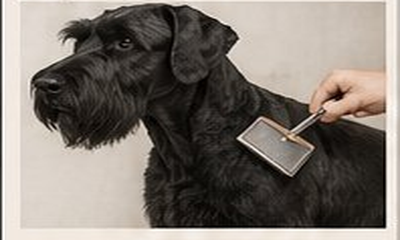
Use a slicker brush and metal comb to remove loose hair and tangles. Don't skip behind the ears, under the legs, and the furnishings. If you're matted before you start, bathing makes it worse.
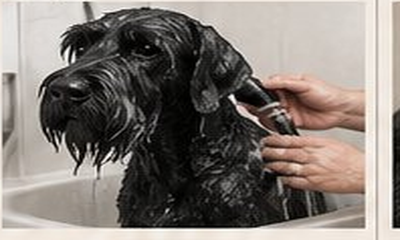
High-quality dog shampoo, rinse well, force dry completely. The undercoat must be bone dry before you clip or cut. On a Giant, this takes longer than you think. Plan accordingly.
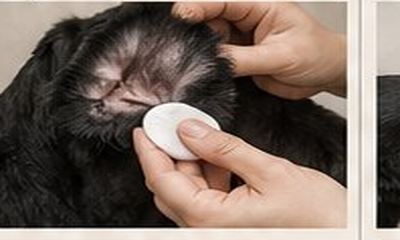
Ear cleaner and cotton balls. Check for redness, wax buildup, or odor. Floppy ears trap everything. This step isn't optional — it's preventive care.
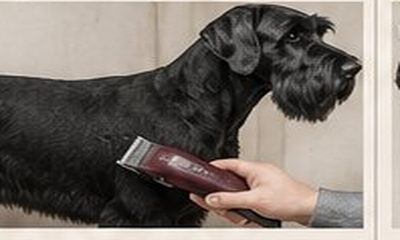
5F or 7F guard on the clipper depending on length preference. Clip in the direction of hair growth. Even, steady passes. Don't rush the body or you'll chase lines all day.
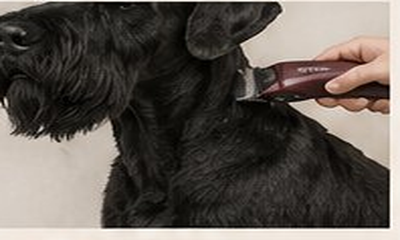
Blend the neck and shoulders into the body using the same guard. Take your time here — this transition is where amateur grooms show their seams. Literally.
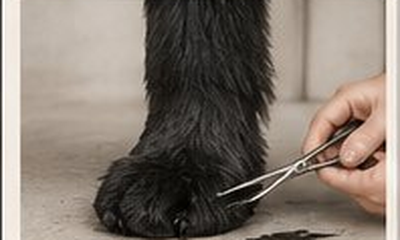
Longer guard (5F–7F) on the legs, then neaten the feet. Trim hair between the pads for better traction — especially important if your dog lives life on the road.
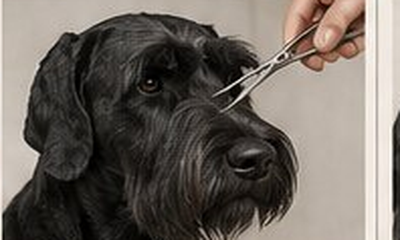
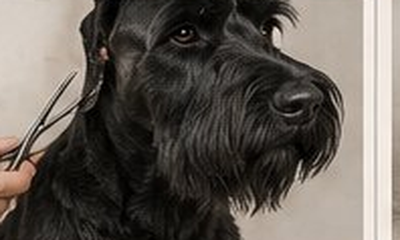
Scissors on the top of the head. Keep the beard full and natural, trimming just the ends for shape. Clear hair from eyes if needed. The beard is the character — don't massacre it.
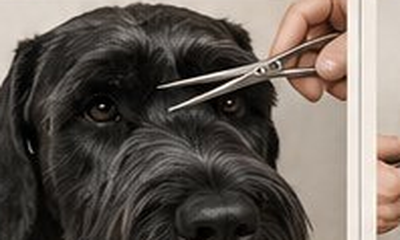
Curved scissors, follow the natural arch. The goal is to keep eyes clear without changing the dog's expression. Over-trim and you've got a different dog. Trust the arch.
Thinning shears to soften hard transition areas. Check symmetry on both sides. Step back and look at the whole dog before you declare it done.

Trim nails, check paw pads, do a final pass over the whole dog. Missed spots, mats you rolled over, skin irritation — catch it now, not at the vet in two weeks.
Most groomers won't tell you this. Most owners find out too late. If you clip a Giant Schnauzer repeatedly over time, you will permanently change the nature of the coat — and you cannot undo it.
The undercoat sits beneath the surface — fine, soft, and packed tight. Its job is insulation. It doesn't give the Giant Schnauzer its look. It doesn't repel water or debris.
Left unmanaged, the undercoat mats. It traps moisture against the skin. It crowds out the follicles trying to grow proper topcoat. Regular brushing and carding keeps it from taking over.
The topcoat is what makes a Giant Schnauzer look like a Giant Schnauzer. Coarse, close-lying, wiry guard hairs that repel water, resist dirt, and hold color. On a black dog like Toddy, it's what keeps the coat black — not brownish-gray.
The wiry topcoat grows in cycles. When a guard hair dies, it needs to be removed — by hand stripping or carding — so a new hard hair can replace it. Clip it instead and the follicle gets no signal.
Every time you clip instead of strip, you're cutting both the dead topcoat and the living undercoat to the same length. The undercoat grows faster. Over time it wins. The wiry guard hairs get overtaken, the coat goes soft, and on a black dog the color fades to gray or brown. Once a dog has been clipped for years, transitioning back to a proper wiry coat is extremely difficult — and in some dogs, not possible.
Dead guard hairs are pulled out by hand — fingers or a stripping knife that grips rather than cuts. This signals the follicle to grow a new hard hair. Texture is preserved. Color stays true. The coat stays weatherproof.
Clippers cut hair at a set length. Quick, cheap, available anywhere. The dead topcoat gets cut but not removed — the follicle gets no signal to replace it with a hard hair. The undercoat gradually takes over.
Hand stripping is not difficult once you understand what you're doing. You're not yanking hair. You're removing dead hair that's already ready to come out. When the timing is right, it releases easily. If it's pulling hard, the hair isn't ready — move on and come back.
Pinch a small amount of topcoat between thumb and index finger and gently pull in the direction of growth. If it slides out easily with minimal resistance, the coat is "blown" and ready to strip. If it holds firm and the dog reacts, it's too early. Strip dead hair only — never live hair.
Sprinkle grooming chalk or cornstarch into the coat before starting. It absorbs oil and gives your fingers traction on the hair shaft. Particularly useful on a freshly bathed coat where everything is slippery. Rubber finger cots are another option for extended sessions.
Always pull in the direction the hair grows — never against it. Lay your free hand flat on the skin near where you're pulling to keep it taut. Take a few hairs per pinch, not fistfuls. Work systematically — back, sides, neck, then detail areas.
A stripping knife doesn't cut — the serrated blade grips. Fold a small amount of hair over the blade with your thumb, trapping it, then pull in the direction of growth. Coarse knife on the body and back, fine knife around the head, ears, and transitions.
Don't strip the entire dog to the skin at once. Take off roughly one-third of the coat evenly across the body. Six weeks later, another third. This keeps the dog in coat at all times, avoids the awkward patchy in-between phase, and makes each session shorter.
A calm dog tolerating the process is fine. Squirming, vocalizing, or skin twitching means you're pulling live hair, the skin is irritated, or the dog needs a break. Stop. Reward. Resume. Keep sessions to 20–40 minutes max with a dog new to stripping.
The first full strip after years of clipping is the hardest. The undercoat will be thick, the topcoat will be soft, and it takes multiple growth cycles before a proper wiry coat comes back — if it comes back at all. Starting stripping while the dog is young, before the coat has been compromised by repeated clipping, is always the right move. If Toddy's been clipped, start carding consistently now and introduce selective stripping on the back saddle where it matters most visually. Don't try to fix everything in one session.
Carding is what you do when you're not fully hand stripping but you're not willing to let the coat go completely soft either. Done consistently, it meaningfully slows the softening process and keeps the undercoat from overwhelming the follicles. It's also the right maintenance tool between full strip sessions.
A carding tool — an undercoat rake, a carding comb, or a stripping knife held flat — is pulled through a dry coat in short, firm strokes. It grabs dead undercoat and loose dead topcoat and pulls it out without cutting live guard hairs.
Wet hair stretches before it breaks. Card a wet coat and you're not removing dead hair — you're snapping live guard hairs at the shaft. Card before bathing or well after the coat is fully dry. Use a force dryer and verify with your fingers.
Hold the skin taut with your free hand. Pull the carding tool in short, firm strokes in the direction of hair growth — not against it, not in circles. You want resistance as dead undercoat pulls free. Work section by section: back, sides, neck, shoulders.
For a dog with a harsh, correct coat: card every 4–6 weeks between strip sessions. For a soft-coated or heavily clipped dog you may need to card weekly to prevent the undercoat from clogging the follicles. When you're unsure, card more often.
If you're clipping, carding is still essential — not optional. Clipping removes the hair above the skin but leaves dead undercoat packed in the follicle. Over time this accumulation clogs the follicle and leads to sores and pustules common in clipper-only Schnauzers.
The practical middle ground: card or clip the sides and legs where full hand stripping is hardest to manage, and hand strip the back saddle — the most visible section. This takes less time than a full strip and preserves more coat texture than clipping alone.
When Schnauzers are clipped repeatedly without carding, dead hair, oils, and cellular debris accumulate in the follicle. The follicle narrows. The skin reacts. The result is sores, pustules, and a dog that's uncomfortable and prone to recurring skin infections. A carding session followed by a thorough bath is the simplest preventive measure. Do it every 4–6 weeks minimum regardless of whether you clip or strip.
Prevents mats forming in the furnishings and keeps the undercoat manageable between full grooms.
Keep them dry after baths or swimming. Floppy ears don't self-ventilate. Weekly check prevents infections from becoming a recurring problem.
Maintain shape and coat health on schedule. Pushing it longer means more work and a more uncomfortable dog.
Regular grooming builds trust. A dog that tolerates grooming well is one that's been handled consistently since puppyhood.